3D Models
Now that we have covered the basic features and components of Hololens, let's start a new project to explore other elements and methods.
In this chapter, we will cover how to work with 3D models, mainly importing them from your 3D modeling software and animating them according to your preference.
Let’s start a new project by setting the scene, camera, and renderer as we did in the previous chapters.
var hololens = new HoloBuild.HoloCamera();
var holoscene = new HoloBuild.HoloSpace();
var holorenderer = new HoloBuild.HoloRenderer();
And we need to add a renderloop function to animate the scene that we recall again and again to render any changes to it continuously:
function renderloop() {
	window.requestAnimationFrame(renderloop);
	holorenderer.render(holoscene, hololens);
}
renderloop();
Before working with our model, we have to prepare the space further to look pleasant and appealing by adding some light. Directional light
illuminates the holograms in the space. It is important to know the system will add ambient light by default
to your hologram so that we can see it, otherwise your hologram might show as black.
Default ambient light is usually spread equally across your holograms in the scene. If you want to customize the lights of your holograms,
you can add a directional light which emits light in a specific direction.
The HoloBuild library provides you with the option to choose between several types of lights like HoloDirectionalLight, HoloSpotLight, and HoloPointLight (light that emits
from a single point).
Let’s add a directional light using the code below:
var directionalLight = new HoloBuild.HoloDirectionalLight( 0xffffff, 1 );
directionalLight.position.set( 0, 2 , 1 );
holoscene.add(directionalLight );
The "HoloDirectionalLight" class has 2 main parameters: the color, and the intensity. In the above code, we instantiated a HoloDirectionalLight class and assign it to the variable "directionalLight". We set the light color to 0xffffff and its intensity to 1. 0xffffff is the hex color code, a six-digit three-byte hexadecimal number used to represent colors. Our code here represents the color white. If you are not familiar with hex codes, feel free to check this Wikipedia link here: hex codes.
The intensity is another parameter of the directional light class, which ranges between 0 and 1, where 1 is the maximum intensity of the light.
After setting the light, we positioned it in a convenient location which is in the center of x-axis (0), elevated for 2 meters (y-axis: 2), and 1 meter diagonally further from the camera (z-axis: 1). Then we added the light to the scene. This code is all placed after the holorender definition and before the animation loop as follows:
var hololens = new HoloBuild.HoloCamera();
var holoscene = new HoloBuild.HoloSpace();
var holorenderer = new HoloBuild.HoloRenderer();

var directionalLight = new HoloBuild.HoloDirectionalLight( 0xffffff, 1 );
directionalLight.position.set( 0, 2 , 1 );
holoscene.add(directionalLight );

function renderloop() {
	window.requestAnimationFrame(renderloop);
	holorenderer.render(holoscene, hololens);
}
renderloop();
Next we will need to add our 3D model to the scene. For the sake of this tutorial, you can download the bird.gltf model from this link: bird.gltf. Make sure to upload the model to your project before you proceed. To upload a file to your project, right click on the project name and click on "upload files".
Now that all the elements are set in place, it is time to import our 3D model.
The first step is to define a new variable for our model. Then, we can use the “HoloLoaders” class that load objects from a file and return a mesh, a geometry, or a group.
Let’s look at the code from the Holobuild library and discuss it a bit, before we apply it to our project.
var loaders = new HoloBuild.HoloLoaders();
loaders.loadModel(HoloBuild.loader.GLTF, 'bird.gltf', function (model) {
	model.scale.set(0.005, 0.005, 0.005);
	holoscene.add(model);
}, {
	hotspot: true,
        group: true
});
In the code above, the 'loadModel' method enables you to load a 3d model from a file, and it contains the following parameters:
- Type: the model type that could be in the format of OBJ, STL, FBX, or GLTF...
- Filename: the name of the file that is being loaded.
- Callback(model): the function that will be called back with the loaded model
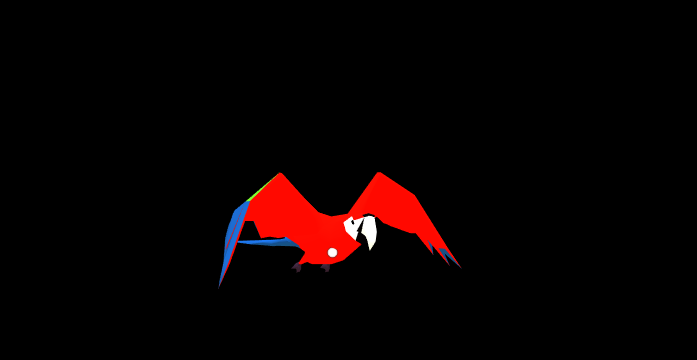
To apply the above code to our project, we are loading a model of a parrot
var bird;
var loaders = new HoloBuild.HoloLoaders();
loaders.loadModel(HoloBuild.loader.GLTF, 'bird.gltf', function (model) {
	bird = model;
	bird.scale.set(0.005, 0.005, 0.005);
	bird.rotation.y= 0.5;
	holoscene.add(bird);
}, {
	hotspot: true,
        group: true
});
In the above code, we introduced the variable ‘bird’.
We then introduced the variable ‘loaders’ and assigned it an instance of the HoloLoaders() class.
Then we called the method ‘loadmodel’, identified the model type as GLTF, since our model is of GLTF type. We then set the filename to (‘bird.gltf), which is the name of the file
We then set the 'bird' variable to reference the loaded model. We scaled the model to 0.005 on all x,y,and z axes. This was necessary since the model was designed on a larger scale. We rotated it on the y-axis by -1 meter so that we can see more angles of the bird.
And last, we added the model to the scene. We also activated the model for user interaction by setting the parameter "hotspot" to true and set the parameter "group" to true to keep the model elements as is (otherwise they will be merged as one object).
.
When we run the code, we get the following results:
Animating 3D Models
Now we need to work on animating our model. We can do that by using the ‘animationClip’ method.
animationClip enables you to animate different properties of your model (colors, opacity, booleans), visibility and transforms. The animated properties can be faded in,
faded out, crossfaded and warped. ‘animationClip’ loads the animation clips that has been allocated or added to the model using the name of any particular animation clip.
It can accommodate a series of parameters that are accessible from the Holobuild library, of which we are introducing only few.
- run(): start running the animation.
- pause(): pause the animation.
- stop(): stop playing animation.
We put the following code directly before the renderloop() function. Let’s check the code:
var btnPlay = new HoloBuild.HoloButton('btnPlay',0.04, 0.04, 0, {text:'play'});
holoscene.add(btnPlay);
btnPlay.position.set(0,-0.2,0);

btnPlay.onTap = function (){
	if (typeof bird != 'undefined')
	{
		var animationName = bird.animations[0].name;
		bird.animationClip(animationName).run();
	}
};
You will notice that we introduced a ‘Play button’ and added it to the scene. We then defined the ‘onTap’ function to animate the bird.
The 'onTap' function run an animation clip.
We first get the name of the animation from the array of animations as follows: “bird.animations[0].name“;
We then run that animation using the "animationClip(animationName).run()";
The if condition is only there to ensure that the typeof bird is defined before running the animation.
Our full code now looks as follows:
var hololens = new HoloBuild.HoloCamera();
var holoscene = new HoloBuild.HoloSpace();
var holorenderer = new HoloBuild.HoloRenderer();

var directionalLight = new HoloBuild.HoloDirectionalLight( 0xffffff, 1 );
directionalLight.position.set( 0, 2 , 1 );
holoscene.add(directionalLight );

var bird;
var loaders = new HoloBuild.HoloLoaders();
loaders.loadModel(HoloBuild.loader.GLTF, 'bird.gltf', function (model) {
	bird = model;
	bird.scale.set(0.005, 0.005, 0.005);
	bird.rotation.y= 0.5;
	holoscene.add(bird);
}, {
	hotspot: true,
        group: true
});


var btnPlay = new HoloBuild.HoloButton('btnPlay',0.04, 0.04, 0, {text:'play'});
holoscene.add(btnPlay);
btnPlay.position.set(0,-0.2,0);

btnPlay.onTap = function (){
	if (typeof bird != 'undefined')
	{
		var animationName = bird.animations[0].name;
		bird.animationClip(animationName).run();
	}
};

function renderloop() {
	window.requestAnimationFrame(renderloop);
	holorenderer.render(holoscene, hololens);
}
renderloop();
We can see the results below:
If the 3D model file already contains a set of animations, then we can use the animationClip method to animate it.
Over and above, we have developed additional methods to enable developers to animate specific actions and to provide them with further control of the scene.
One of these methods is animateMove, which enables you to animate the movement of the model from one location to another.
So let's move our model.
animateMove main inputs are 'location', 'animation duration', 'animation pause', and 'callback' function when the animation is done.
The 'location' is a location in 3D space that will influence the model's next position.
The ‘duration’ parameter is the duration of the movement.
The ‘pause’ parameter is the time the model will pause before it starts the animation.
The 'call back’ is the function that will be executed after the animation is over.
The optional parameter ‘increment’, which is a Boolean parameter, is directly connected to the 'location' parameter of the model. If set to false, the 'location' vector (x,y,z) will be the new position of the model. If set to true, it will move the model to a new position, which is the incrementation of the old position plus the 'location' parameter.
Let’s write a code to move the bird around the space, non-incrementally, and when the animation is done, we call the same function to start again.
var btnPlay = new HoloBuild.HoloButton('btnPlay',0.04, 0.04, 0, {text:'play'});
holoscene.add(btnPlay);
btnPlay.position.set(0,-0.2,0);

btnPlay.onTap = function (){
	if (typeof bird != 'undefined')
		{
			var animationName = bird.animations[0].name;
			bird.animationClip(animationName).run();
			moveModel();
		}
};
var timer;
var rndX,rndY,rndZ;

function moveModel()
{
	var rndXSign = rndX < 0 ? 1 : -1;
	var rndYSign = rndY < 0 ? 1 : -1;
	var rndZSign = rndZ < 0 ? 1 : -1;
	rndX = rndXSign * (Math.random() / 4);
	rndY = rndYSign * (Math.random() / 4);
	rndZ = rndZSign * (Math.random() / 4);

	var time = 800 + 2000*Math.random();

	bird.animateMove({ x: rndX, y:rndY, z:rndZ }, time, 400, moveModel);
}
In the above code, we added the "moveModel" to the play button's "onTap" function.
Then we introduced the new variables timer,rndX,rndY,rndZ, and we defined them under the moveModel so that they are generated randomly by the function.
We then called the animateMove method of the model (bird) and provided its new position as the random numbers rndX,rndY, and rndZ generated earlier.
We set the duration parameter to the random variable ‘time’, its pause parameter to 400 milliseconds, and its callback function as the ‘moveModel’ itself to be
called again and again repetitively.
The ‘increment’ parameter is set to false, so that the newly generated rndX, rndY, rndZ will not increment over the old position values.
The results will look as such.
In the next chapter, we will start discussing the sound features.