Earth 3D
Overview
This tutorial introduces developing HoloLens applications in JavaScript based on buildwagon, a hololens development platform and libraries that make HoloLens development in JavaScript easy.
The main library that we will be using is HoloBuild, a library that helps you create dynamic holograms and provides a collection of components intended to abstract and accelerate the development of HoloLens applications.
The goal of this section is to give you a brief introduction by setting up a basic HoloLens application that displays earth in 3D.
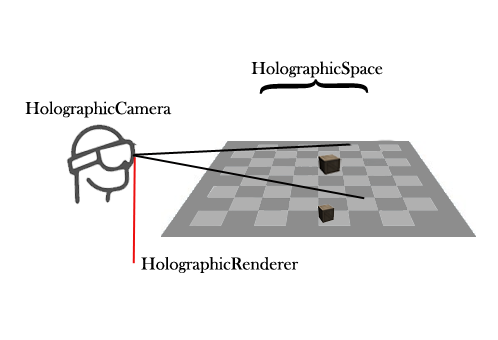
To be able to display anything on a HoloLens we need three things:
- a HoloCamera
- a HoloSpace,
- and a HoloRenderer.
A HoloCamera represents the HoloLens and where it is looking at.
So let's define a hololens variable:
var hololens = new HoloBuild.HoloCamera();
A HoloSpace represents a holographic scene, and its main purpose is to act as a container for all the holograms that make up the scene:
var holoscene = new HoloBuild.HoloSpace();
A HoloRenderer main purpose is to render the content of the holographic scene into the hololens.
var holorenderer = new HoloBuild.HoloRenderer();
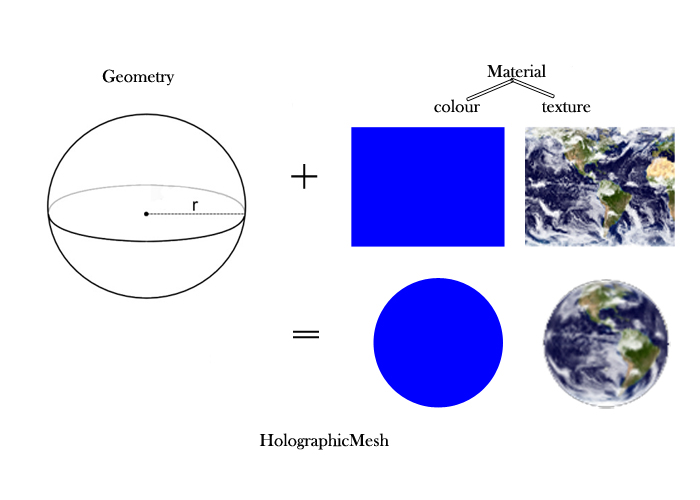
Now, to create a Hologram you need three things:
- a geometry,
- a material,
- and a HoloMesh
The geometry is the shape that you want to draw, it contains all the polygons information that make up a hologram (Geometries will be discussed in more
details in the following chapters).
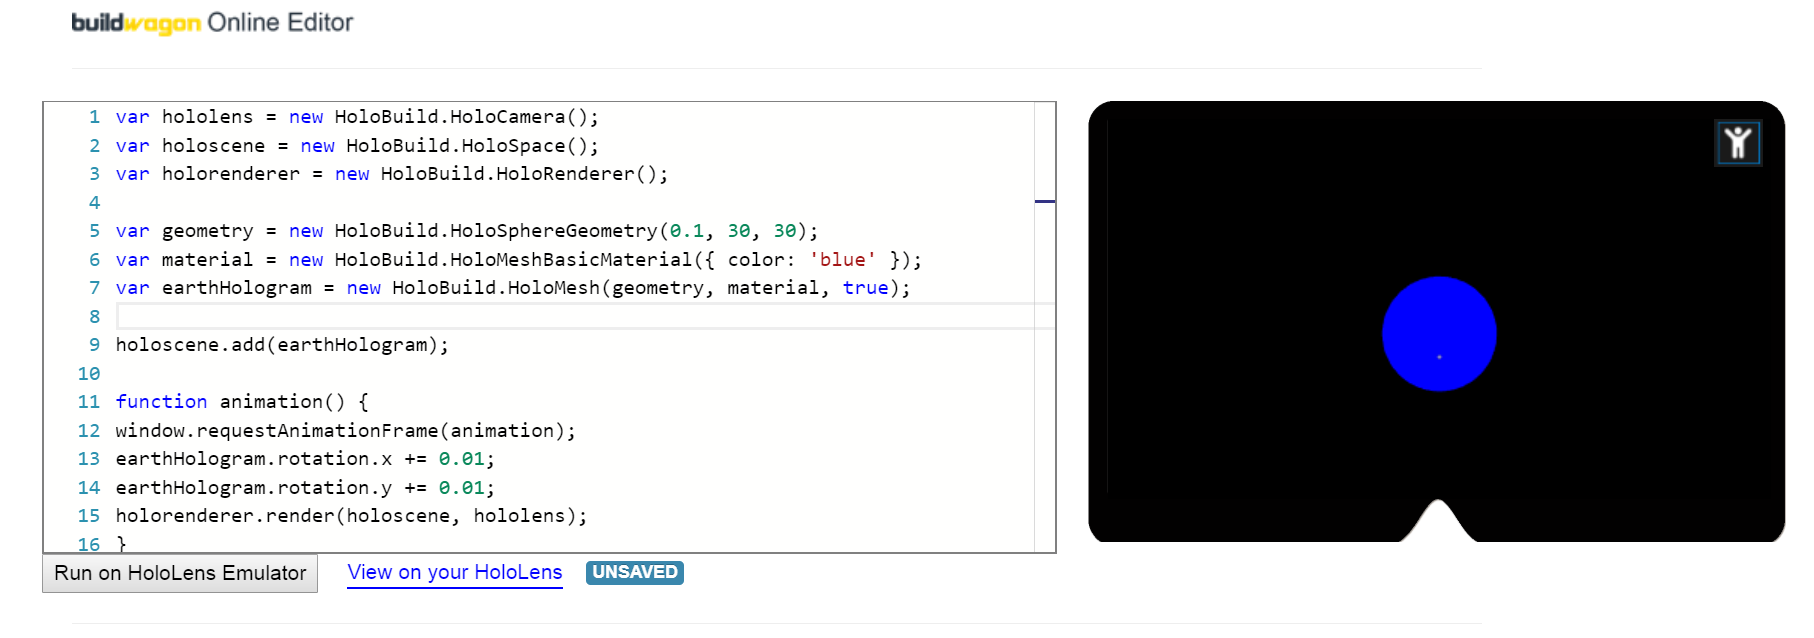
In addition to creating your own geometry, there is a set of pre-built geometries that you can use. So let's get started by defining a sphere geometry.
The sphere geometry takes as input the sphere's three dimensions (radius, HSegments, and VSegments):
var geometry = new HoloBuild.HoloSphereGeometry( 0.1, 30, 30 );
The default holobuild unit of measurements is meters, so this sphere has a 0.1 meters in radius, and 30 is the number of horizontal and vertical segments respectively,
which will give the sphere its perfectly round shape
A material defines how the surface of a geometry is. It describes the geometry appearance such as its color or its texture (i.e. skin).
Let's define a basic material and give it a blue color. By default the "Color" of the material is set to white, and you can change it to any color you want.
The following is how to define a basic material with a blue color:
var material = new HoloBuild.HoloMeshBasicMaterial( { color: "blue" } );
A HoloMesh is an object that takes a geometry and applies a material to it. So it is the combination of a geometry and material into one 3D object or a hologram that can then be added to a scene.
Let's define a holographic mesh that applies the created geometry to the material:
var earthHologram = new HoloBuild.HoloMesh( geometry, material, true );
Lastly, you need to add the hologram to the holoscene:
holoscene.add( earthHologram );
If you run the above code, nothing will show, as you still need to call the renderer to render (or draw) the scene's holograms through the Hololens. ,
To render the holoscene onto the HoloLens, you will need to call the render function of the holorenderer and give it the scene and the hololens as inputs:
holorenderer.render(holoscene, hololens);
Most of the time however, you need to animate your scene, so we will need to re-render the scene at specific interval. This could be done with window.requestAnimationFrame, which takes a function that it will call again and again as efficiently as possible. All you have to do is place your animation code inside that function. Let’s try to add animation into our scene:
function animate(){
                window.requestAnimationFrame(animate);
                holorenderer.render(holoscene, hololens);
              }
          animate();
In this code, nothing much has changed, we have just placed our rendering call inside a function that will be called over and over by the requestAnimationFrame function. Next, we need to add our animation code inside the animate function. Let’s rotate our hologram around its X and Y axes:
function animate(){
    window.requestAnimationFrame(animate);
    earthHologram.rotation.x += 0.01;
    earthHologram.rotation.y += 0.01;
    holorenderer.render(holoscene, hololens);
}
animate();
Every time the animate function is called, the hologram rotation property is increased by 0.01 for x and y axes. This makes the hologram looks its rotating around those axes. Congratulations! You have just created your first HoloLens application. Now, let's see how it looks like on the HoloLens emulator:
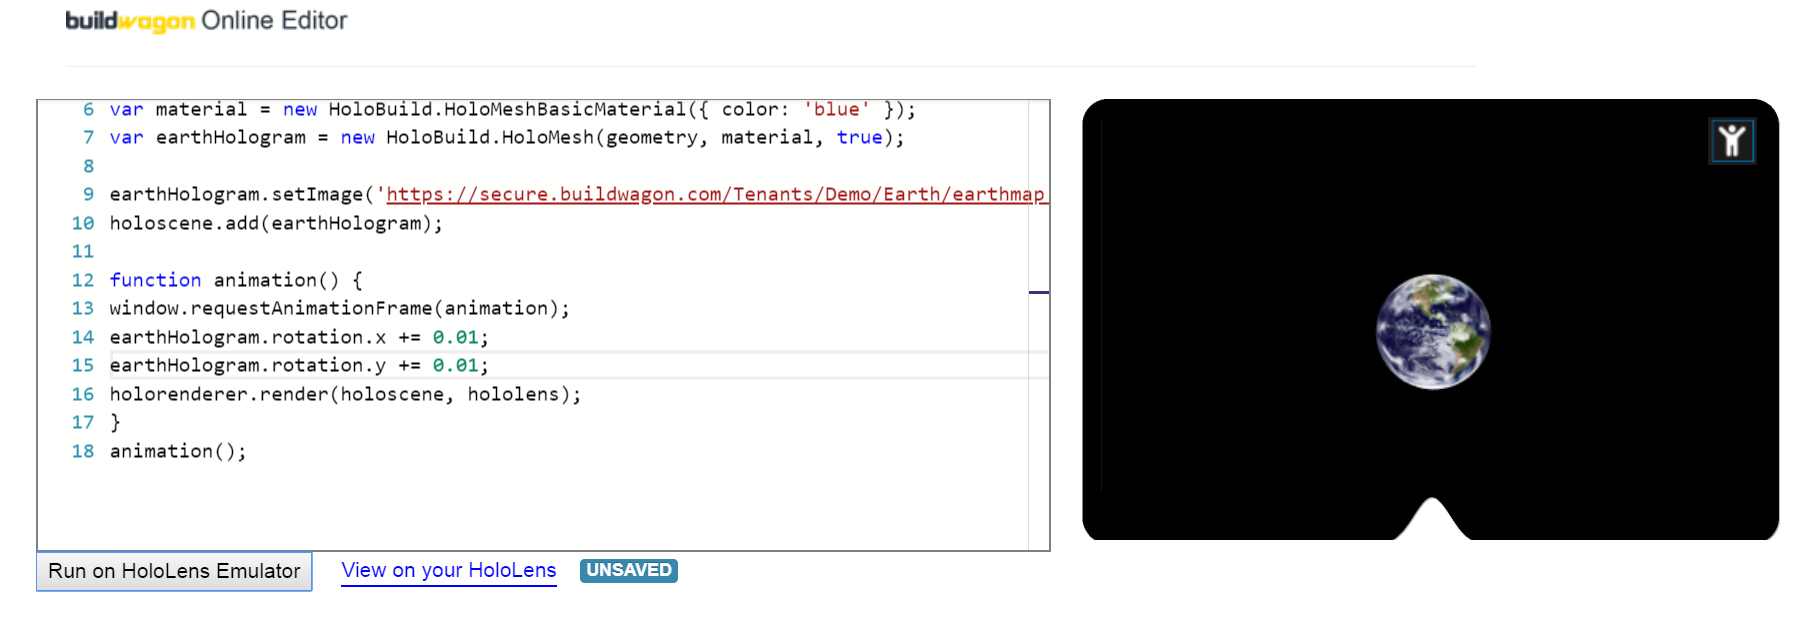
In order to dress the material of the geometry in textures, we can use the method 'setImage'. The 'setImage' feature will set an image on the hologram.. It takes as input an image file name. You can use the following code to set an image as a material.
earthHologram.setImage('https://secure.buildwagon.com/Tenants/Demo/Earth/earthmap.png');
In order to set the image as a material, you have connect it to the url address of the image source. The result should be as follows.
Note: if you are using the buildwagon platform, you need to upload the image to your project and reference it by name: earthHologram.setImage('earthmap.png');.
The 'onTap' property enables you to add a function to the earthHologram, whenever the user taps on it.
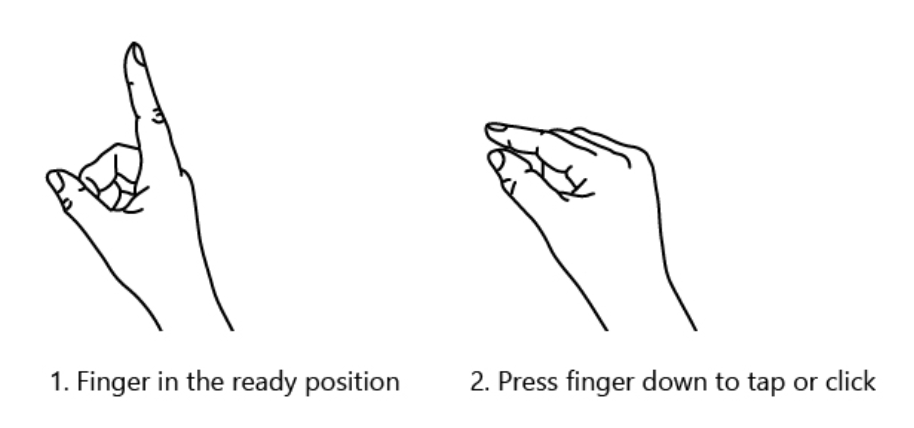
Here the user gazes at the Hologram, and hand presses and releases gesture.
(Hand press: Tap and hold, creating an L with the pointer finger and thumb, and then bring your thumb and pointer fingers together to “air tap”, and then hold).
'onTap' allows us to put in use the 'showAjdust' method, where a helper box will be drawn on top of the HoloMesh to allow the user to manipulate it.
Manipulation includes moving, rotating, and scaling of the hologram. You set which manipulation capabilities you want the user to be allowed to do by setting the parameters as follows:
- rotate (Boolean, Default: true): Will enable the vertical and horizontal rotation of a group.
- rotateVertical (Boolean, Default: true). Will enable the vertical rotation of a group.
- rotateHorizontal (Boolean, Default: true). Will enable the horizontal rotation of the group. Default is true.
- scale (Boolean, Default: true).Will enable the scaling of the group.
- move (Boolean, Default: true). Will enable the moving of the group. Default is true.
In our example, we added the showAdjust method, with its default settings, to interact with the earthHologram:
earthHologram.onTap = function (){
	earthHologram.showAdjust();
}
You can try this code on the online hololens emulator yourself at: buildwagon online editor
Or you can try it on the hololens by starting the buildwagon hololens app and typing: Demo/earth
Or you can check the below video which shows the final result as recorded on the Hololens: