User Interaction
Working in the spaces that we have created, users can interact with the holograms in particular ways, and holograms will respond in return to these interactions.
We introduced the mesh (hologram) concept earlier as an object that takes a geometry and applies a material (cover) to it. To interact with a mesh in a space, it is
important to transform it into a hotspot so that it accepts user interaction. We can do that by using the following code:
var HoloMesh= new HoloBuild.HoloMesh( geometry, material , true);
The above code is telling us that the variable “HoloMesh” has a geometry, and a material, and by setting the lest parameters to true it is activated as a hotspot. A hotspot is a mesh that accepts the user's
interactions. The default of the hotspot property is set to false, so it is important to set it to in order to open up its performance capabilities.
I would like to remind you at this point that the user is wearing the Hololens, which is the camera that overlooks the space.
Gaze
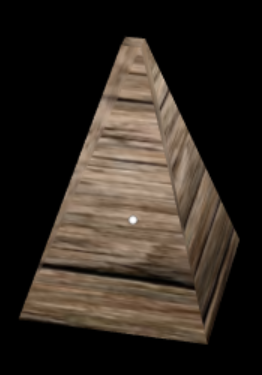
Users can target the objects they want to interact with using their gaze. Simply by looking at the object, a torus shaped element (like a curser) will appear on the object to enable the interaction (as in below).

The user target could be a 2D or 3D elements, whichever projection is facing them.
Providing some salient cue to indicate that an element is "active" (that the user is targeting it) is extremely helpful - this can include treatments like visible "hover"
effects, audio highlights or clicks, or clear alignment of a cursor with an element.
A HoloCursor is a gaze indicator that provides continuous feedback for the HoloLens user about their intentions. The HoloCursor work by following the hololens's position
and rotation, and project a ray from the HoloLens into the HoloSpace object to show the user the center of their gaze. The cursor will move with the user's head movement
and it will look to whatever the user is looking at.
The HoloCursor provides a visual feedback according to the user’s hand state. Thus, you locate an object to interact with it using your gaze, but the interaction is completed is through the gestures of the hands or voice.
The white dot in the screenshot below shows the cursor placed over the object.
Gesture
As stated above, hand gestures allow users to take action in relation to the HoloMesh. Interaction is built on gaze to target, and on gesture or voice to act upon
whatever element has been targeted.
Hand gestures do not provide a precise location in space, but communicates with the HoloLens to allow interacting with holographic content.
Now that we introduced the concept of interacting with the Hololens using the gaze and the gestures, let’s explore the fundamental gestures that are most used with the Hololens.
The Hololibrary provides shortcuts to using these gestures so that your life will be easier.
onTap
onTap property enables you to add a function to a HoloMesh, whenever the user taps on it.
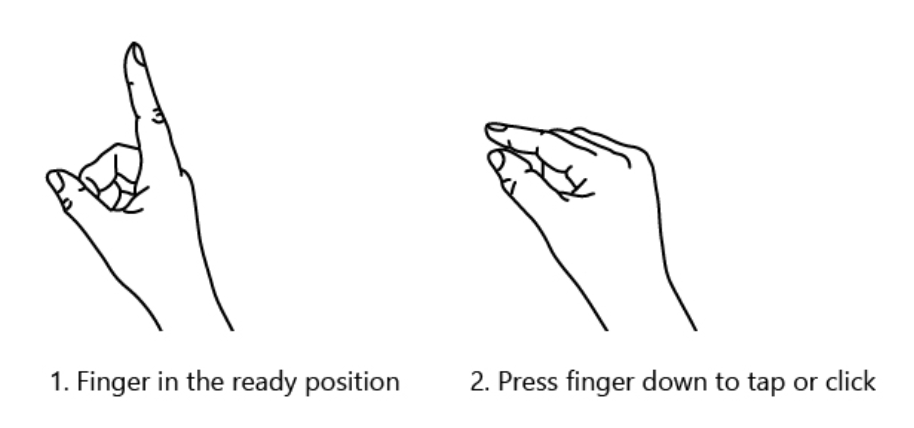
Here the user gazes at the HoloMesh, and hand presses and releases gesture.
Hand press: Tap and hold: creating an L with the pointer finger and thumb, and then bringing your thumb and pointer fingers together to “air tap”, and hold).
The below code, enables us to move the position of the HoloMesh on the x axis when the user taps on it.
var cylindermesh= new HoloBuild.HoloMesh( geometry, material , true);
cylindermesh.onTap = function () {
cylindermesh.position.set (0.5,0,0);
}
The result can be observed here:
Other ways for the onTap function to be called is by pressing the button on a HoloLens Clicker or by speaking the voice command "Select".
Here is another example of the onTap property. The object will double is size on all 3 axes once we tap on it.
The code used of this interaction is below:
var hololens = new HoloBuild.HoloCamera();
var holoscene = new HoloBuild.HoloSpace();
var holorenderer =  new HoloBuild.HoloRenderer();

var cylindergeometry = new HoloBuild.HoloCylinderGeometry(0.01, 0.1, 0.2, 4);
var cylindermaterial = new HoloBuild.HoloMeshStandardMaterial( { color: 'red' } );
var cylindermesh= new HoloBuild.HoloMesh( cylindergeometry, cylindermaterial, true);
holoscene.add(cylindermesh);

cylindermesh.position.set (0,0,0);
cylindermesh.setImage('images/woodenbox.png');

cylindermesh.onTap = function () {
cylindermesh.scale.set(2,2,2);
}

function renderloop(){
window.requestAnimationFrame(renderloop);
cylindermesh.rotation.x += 0.01;
cylindermesh.rotation.y += 0.01;
holorenderer.render(holoscene, hololens);
}
renderloop();
The result could be observed below:
onHold
The “onHold” property allows you to add a function to the HoloMesh. It works as such.: The user gazes at it, performs the press gesture, and moves their hand while
holding the press gesture.
The code below allows you to change the HoloMesh position on the x axis according to the users hand gesture. This interaction combines user gaze on the HoloMesh and the
user hand press and moving gesture. The function will be called with 2 positions vectors, the previous position and the current one.
cylindermesh.onHold = function (data) {
	cylindermesh.position.x -= (data.previousPos.x - data.currentPos.x);
}
The result could be seen here:
To hold and move the object on both x, y axes, all you have to do is adjust the code to the below:
cylindermesh.onHold = function (data) {
	cylindermesh.position.x -= (data.previousPos.x - data.currentPos.x);
	cylindermesh.position.y -= (data.previousPos.y - data.currentPos.y);
}
The result could be seen here:
setTooltip
The setTooltip shows a text on top of the HoloMesh that will be shown if the user hover at the HoloMesh for over a 1 second, it takes as input a text value.
cylindermesh.setTooltip('Hello', {showLine:true});
The “setTooltip” can take other parameters such as the following:
- Size (number, default is 0.015): The tooltip size.
- Color (color, default is 0xFFFFFF). The tooltip text color.
- bgColor (color, default is 0x048ad7). The tooltip background color. Default is 0x048ad7.
- showLine (Boolean, default is false). If set to true the tooltip will have a dotted line drawn from the ToolTip down to the HoloMesh.
- rounded (Boolean, default is true). If true, the tooltip will be rounded.
- Gap (number, default is 0.035). The gap in meters between the HoloMesh and the tooltip.
- yPos (number, default is 0). The tooltip size.
Let’s insert the code below and check the results:
cylindermesh.setTooltip('The pyramid', {size:0.15, color: 0xFFFFFF, bgColor:0x048ad7, showLine:true, rounded:true, Gap:0.035, yPos:4});
Here is our result
Gestures include other animations such as the setAnimation, set TagAlone, setTooltip, and others. We are including a brief description of some below. Feel free to experiment with the support of the HoloBuild library.
setAnimation
The “setAnimation” sets an animated image on the HoloMesh, it takes as input an image file name. The image file contains a set of images (or frames) concatenated next to each, which will be played in a loop (similar to an animated gif).
setTagAlong
The (boolean, distance) If set to true, the HoloMesh will never fully leaves the user's view. It will act as if it is attached to the user's head by rubber bands: When the user moves, the content will stay in his view. The distance is an optional parameter that specify how far is the HoloMesh from the user.
Speech Recognition
The speech recognition component recognizes your speech and enables you to perform voice commands. You can ask the hologram to perform different actions based on selected and specific words. All you have to do is connect the selected word with the function defined.
By default the application have the "select" command enabled: when users say the world “select”, the hologram signified by the cursor will be selected accordingly.
addVoiceComand
The parameters of the addVoiceCommand are the “command string”, which is the string that you want the system to recognize, and the “callback Function, which is the the function that will be called once the system recognizes the string command.
Let’s look at the following simple code.
HoloBuild.HoloSpeechRecognition.addVoiceCommand('move', function () {
cylindermesh.position.x +=0.1;
});
In the above example, the string command is the word ‘move’, and the function will move the cylinder on the x-axis by 0.1 meters to the right every time the command is executed. Try it yourself on the Hololens; it is very cool
Two other components are important to speech recognition and voice commands:
-
updateVoiceCommand
enables you to update the callback function of an already defined voice command. -
setConfidence (level)
offers you the capacity to highlight how confident the system should before calling the callback function.
Feel free to explore the above components in the Holobuild library.